Records Spotify to mp3 without ads while it plays and includes media tags to the recorded files
How to install Spytify?
Here’s how to download, extract and open Spytify.
Download Spytify-v.X.Y.Z.zip in the assets section of the latest release.
Extract all the content of the zip file.
Find Spytify.exe and run it.
If a pop-up appears, it’s a warning that comes from Windows Defender because Spytify is not registered to Microsoft Store. They prompt that message to protect you and your PC against malwares and/or unknown publisher. Spytify is an unknown publisher because I decide not to make profit out of it, I provide it for free, I’m not a company, so I have no good reason to pay Microsoft to get a developper license and remove that warning. You just have to trust me or trust the code (available on GitHub). So to open the app, click on More Info then on Run anyway and the app should appear.
If Spytify.exe cannot be found, make sure your security software did not remove it.
How can I maximize the audio quality of my recordings?
Spytify relies on your audio device quality to record audio files. If your choosen audio endpoint device in Spytify produces bad .mp3 quality, I suggest you :
Use another device like the your main PC sound board.
Avoid using a bluetooth audio device.
Avoid using a cheap external usb sound card.
Use a different computer/laptop if it has a better sound card.
Install Virtual Audio Cable that comes with Spytify and connect both apps with it.
When encoding, .mp3 has a limitation of 2 channels (stereo) and a sample rate of 44,000 Hz, compare to .wav that has less limitations.
You can increase the bitrate in Spytify settings, but if you have Spotify Free it normally delivers music to 160kbps and 320kbps on Premium.
Using Spotify desktop app, click on your profile and go to your settings.
In Music Quality section you will find:
Streaming quality should be set to Very High (or High with Spotify Free).
Normalize Volume should be turned on.
Click on Show advanced settings:
Turn off Crossfade songs in the Playback section.
Turn off Allow smooth transitions between songs in a playlist in Automix section.
Turn on Enable hardware acceleration in Compatibility section.
If you want to avoid recording suggested songs by Spotify when the music ends.
Turn off Autoplay similar songs when your music ends in Autoplay section.
Don’t forget to max out the Spotify volume bar inner-app (bottom-right corner).
Which audio endpoint device should I use for best recording quality? (Virtual Audio Cable)
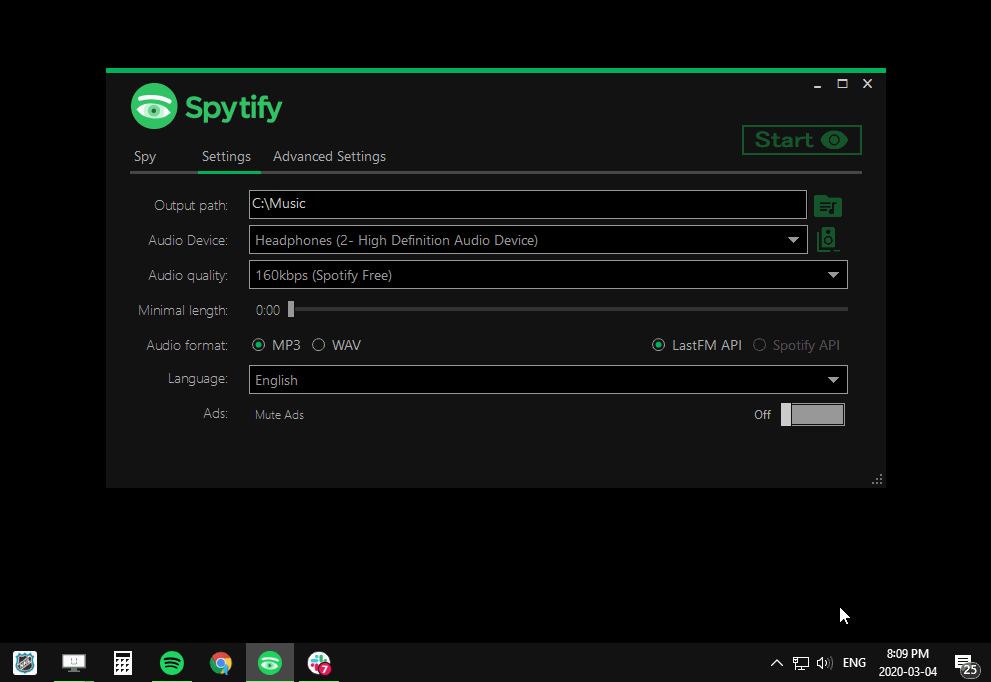
In Spytify Settings tab, under Audio Device, you will find a list of hardware devices that emit sounds, but you can also add virtual devices to this list.
Virtual devices don’t have to do the big round-trip to render sound to you through a physical device, they can bypass that and keep the original audio quality much longer when sending it to different endpoints.
Below is the difference of using a normal/low end audio device versus a decent/high end audio device versus a virtual device, all recorded at 2CH 24bits 44kHz @160kpbs using a Michael Bubble xmas song.
Normal (RealTek High Definition)Decent (Crystal Sound 3)Virtual (Virtual Audio Cable)
Spytify comes with a Virtual device that you can install from the app, or download it yourself: Virtual Audio Cable Device
Go to Settings, at the far right of Audio Device, click on the Speakers button and the click on Install Driver
After installing the driver, it will appear in the audio device list.
The selected audio device has to be the one that Spotify is set on.
If you change your default audio output (Audio icon in the taskbar) to this device, you will be able to record better quality with Spotify/Spytify. However, you won’t be able to hear anything since it’s a virtual device that has no physical output, unless you reroute the output to your main audio device by turning on the Windows option Listen to this device.
The way to use it properly is to isolate Spotify and Spytify on this virtual device to record better audio, and you can use the Spotify web app with a different account for your daily music needs while your playlist is being recorded, or just let Spytify record overnight.
How to isolate Spotify and Spytify to a different audio endpoint device to eliminate noise?
By using the Spytify setting Audio Device, you can move Spytify to a different audio endpoint and Spytify will route Spotify as well to this device.
If you need a better audio endpoint because your sound card has issue with volume control while recording or encodes bad mp3 qualities, you can install a virtual device (like Virtual Audio Cable that comes with Spytify) to have recordings closer to the original Spotify quality.
If the Spytify fails to route Spotify to your audio device, you can move it manually like so:
Press Windows key and type Sound mixer options, you should land on the setting page titled App volume and device preferences.
Make sure Spotify is playing and set the app to the desired endpoint using the Output select list.
Restart Spotify. Spotify and Spytify should now be isolated from any undesired sound.
If you can’t find the Windows 10 setting, try the section Windows 10 Settings 🡂 System 🡂 Sound, scroll down to the Advanced sound options 🡂 App volume and device preferences setting.
How to reroute sound/output of a virtual audio device to my main audio device to listen to it?
Virtual Audio Device are a good way to isolate apps together and get better recordings quality. However, by default, the apps you set on this device cannot be heard once you move them to this device, even if you change your default audio device for this one.
To be able to still listen to Spotify when you are recording with Spytify with a Virtual Audio Cable device. You can do one of the following:
use the Spytify advanced setting Always listen to Spotify current playback on the default audio device
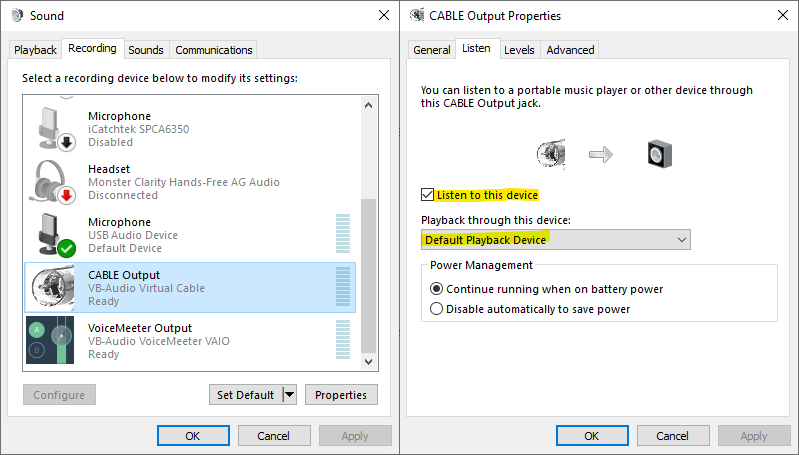
set the Windows option Listen to this device in the device properties.
Windows option: Listen to this device option
Right click on the Audio 🔉 icon in the taskbar and select Open Sound settings, go down to the Sound section and select Sound Control Panel. In the Recording tab, select the CABLE Output device, then click on Properties. In the Device properties window, under Listen tab, check the option Listen to this device.
Click Apply and you should now hear it (and it won’t record YouTube or other background noise).
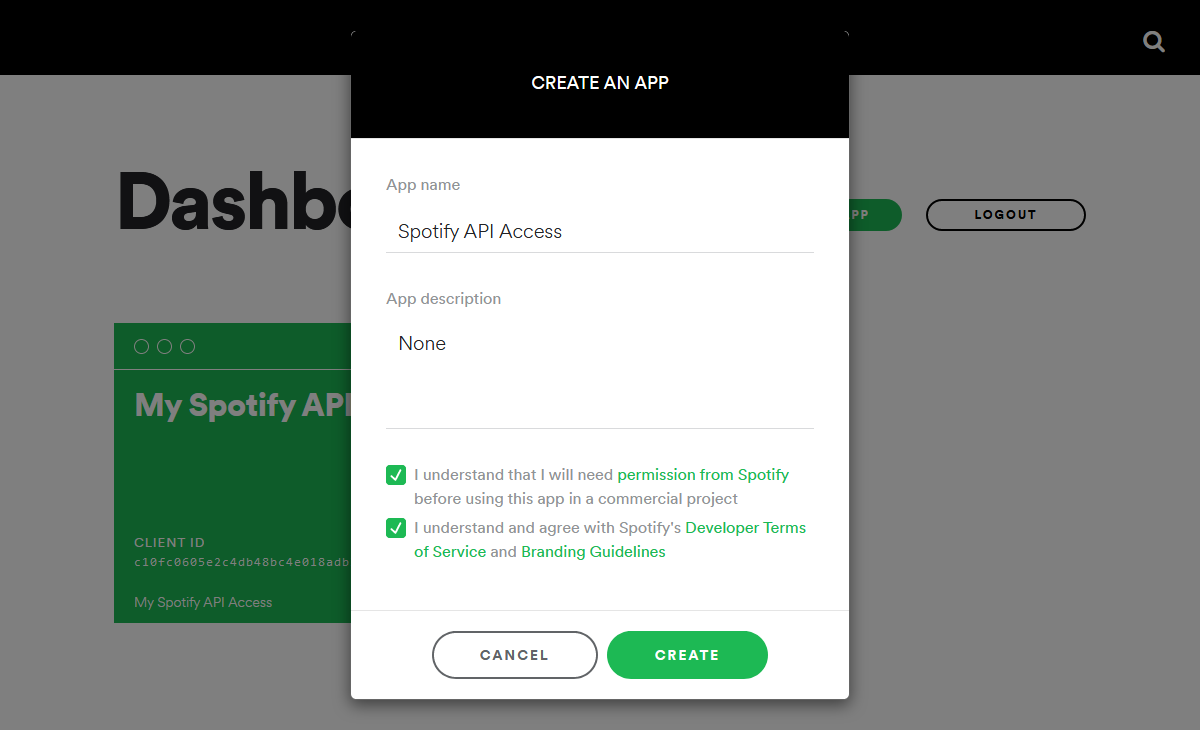
How to use Spotify API to get better (more accurate) media metadata and album cover?
You can switch between last.fm API to Spotify API to get more accurate metadata, but it requires an account to be able to gather media info from Spotify.
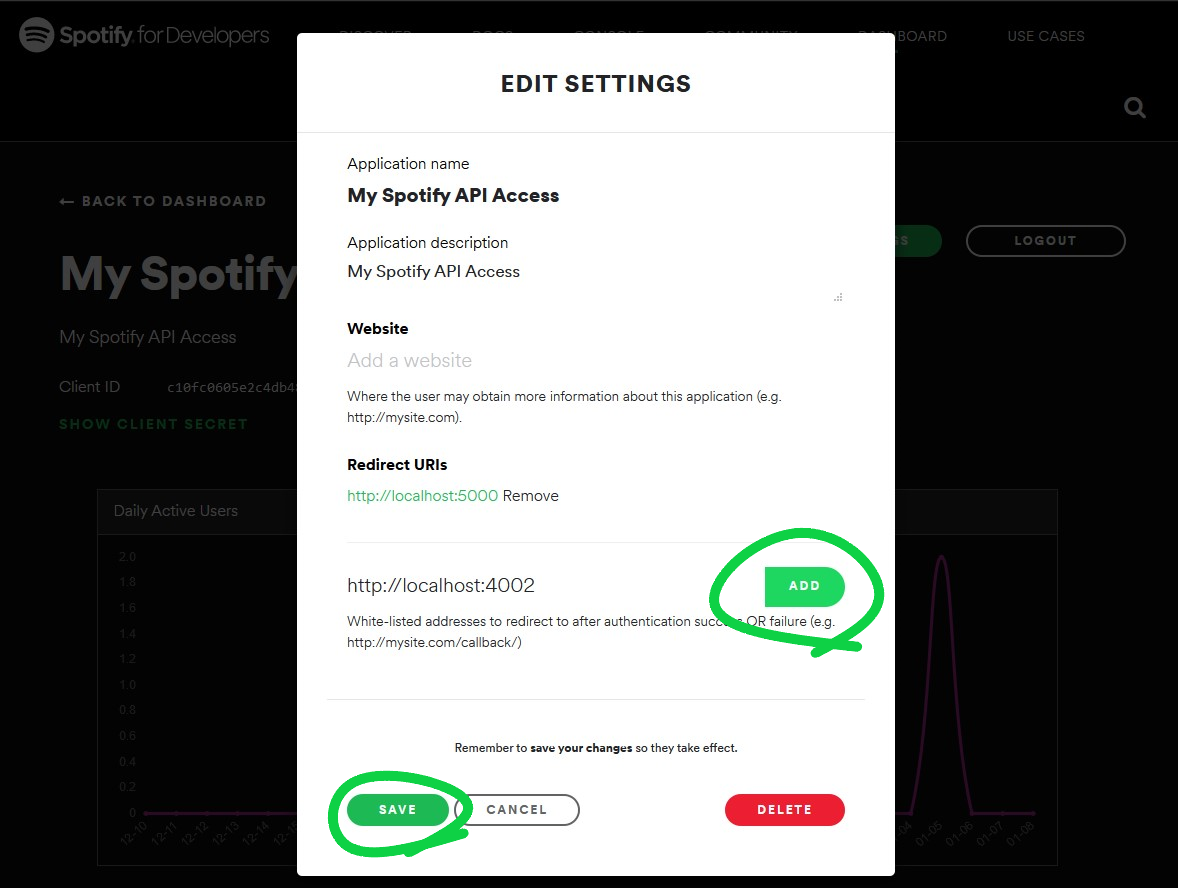
Once created, click on your new spotify application and click on Edit the settings
Add a Redirect URI :
By default, Spytify recommands http://localhost:4002, so you can use this one;
If port 4002 is not available on your computer, you can choose another one like 5000;
If you have a proxy, enter your proxy URL instead of those mentionned above;
Click on Add, and on Save at the bottom.
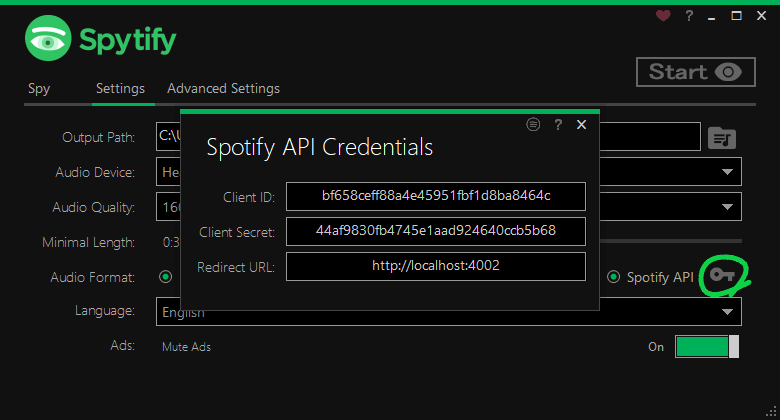
Now, copy some information to Spytfiy to be able to connect Spotify API to Spytify.
Open Spytify settings, open Spotify API Credentials modal using the key 🔑 icon and copy those info from your Spotify App Dashboard :
Client ID
Client Secret (expand the Show Client Secret on the dashboard to reveal the key.)
Redirect URI (if you added an URI different than http://locahost:4002)
How to reduce my audio endpoint quality for mp3 encoding since multi-channel is not supported?
Multi channels audio endpoint device are not supported when encoding to MP3, it must be at least stereo channels with a sample rate of 44,000 Hz. You can change an audio endpoint channels configuration by:
Typing Sound Settings in Windows menu
On the right side bar, use the link Sound Control Panel
Find and select your audio endpoint device in the list
Click on Configure
Make sure Stereo channels is selected, otherwise select it, then applies the changes.
Why am I hearing background/outside noise on my recordings?
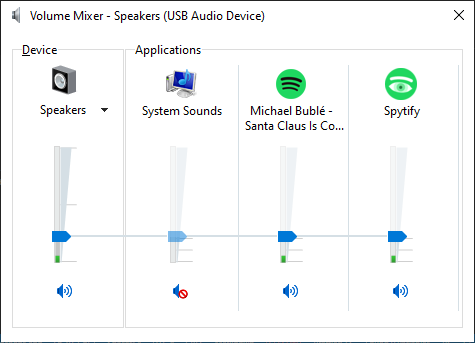
Make sure Spytify successfully muted all applications in the Volume Mixer while recording. Only Spotify and Spytify should not be muted.
Cracking/popping sounds may come from :
Cracking sounds can be heard while playing songs on Spotify and ends up being recorded to the recording file.
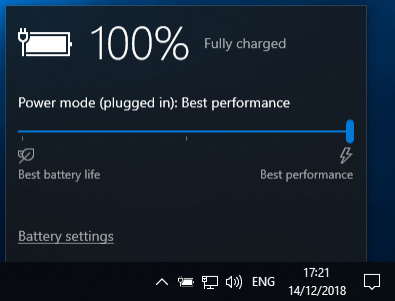
Can be caused by your computer using a low consumption power plan settings that reduces the cpu max performance and impacts at the same time the audio encoding.
On Windows set your power plan to performance and in the taskbar set the performance to 100% (if you are on a laptop for instance).
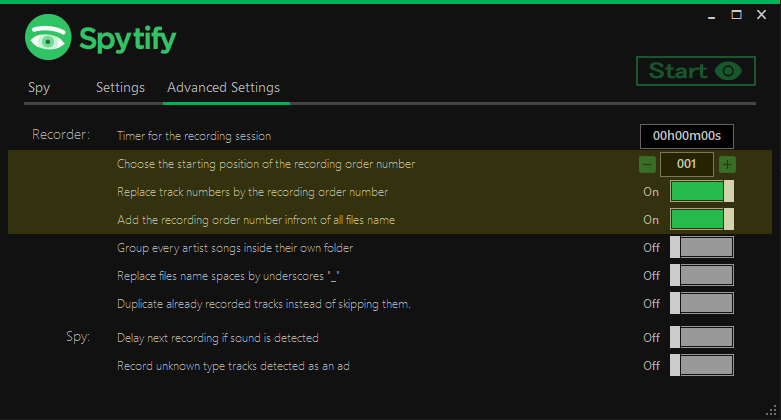
How to keep the same order than the recorded playlist on my recordings?
The recording order number option 017_Artist_-_Title.mp3 is useful if you want to burn songs to CDs and that your MP3 player, like those in cars, orders songs by filename.
You will get a CD with songs ordered in the same order than the album or the one shown by Spotify. If it’s a playlist, order it first on Spotify before recording it.
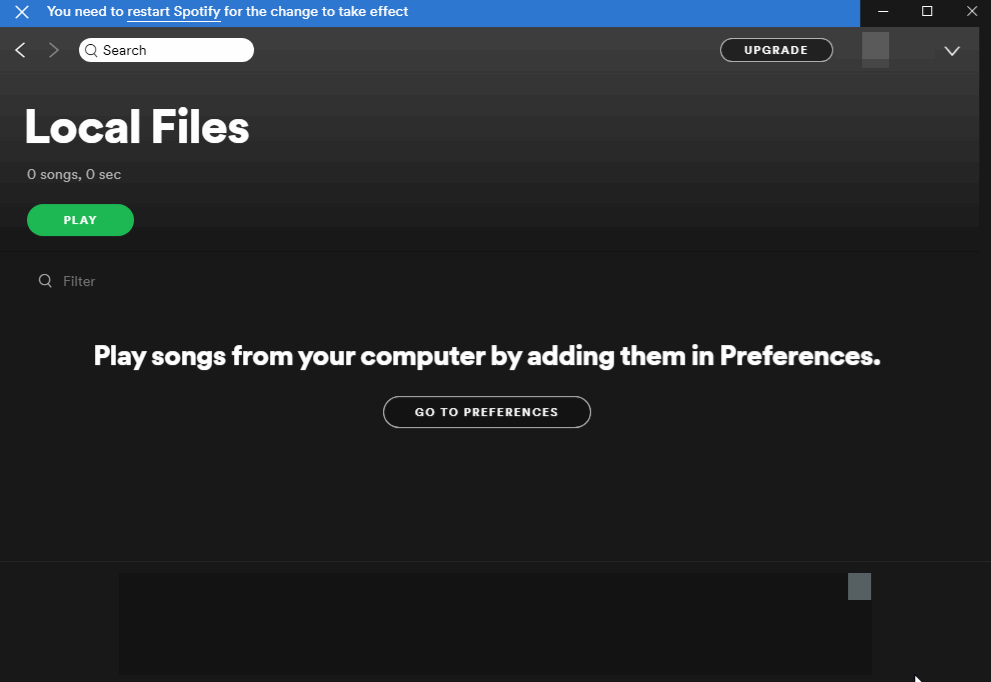
Why Spotify now only plays a part of my tracks that I usually play on the app?
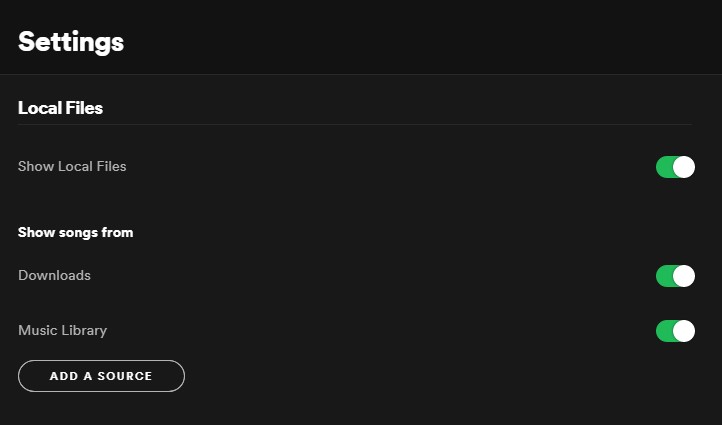
By default, Spotify looks for local music files before playing a track if the option is enabled in Spotify settings. If it finds one that matches the metadata of the current track, it will play the local one instead. Only part of tracks play because the recording probably stop before the end of the song, resulting in a partial recorded track.
You can display local files in your Spotify Desktop app settings in the Local Files section with the toggle Show Local Files.
Just delete those that are incomplete tracks in your music directory or in the Spotify app to solve your issue.
You can also remove your Music library from the setting Show songs from.
Why podcasts/others are detected as ads and cannot be recorded?
Podcast, audio book and any other uncommon track type are detected as an ad. By default, Spytify won’t record those but you can change that behavior in Advanced settings by enabling Record everything. Be aware that you may record real ads at this point, and when using that option the Mute ads option will be turned off.
Also, some tracks may be identified as ads sometimes because Spotify is changing track but it did not give the proper track title to Spytify yet, maybe because is still loading or it just had an issue. When this happen, it’s often because you navigate in the app between a radio station and a playlist. Restarting the track normally fix the issue. If it happens too often, create a playlist of the songs you want to record and play it to the end.
Why some tracks overlap another track at the beginning/end of it?
Use Audacity (a free editor for audio files) to cut the audio section that you want to remove and export it back to the same audio type.
Sometimes, Spotify doesn’t provide the current track info in time resulting in these results. Also, you may have better results after tweaking Spotify settings.